适配器模式
- 适配器模式(Adapter Pattern)将某个类的接口转换成客户端期望的另一个接口表示,主的目的是兼容性,让原本因接口不匹配不能一起工作的两个类可以协同工作。其别名为包装器(Wrapper) .是作为两个不兼容的接口之间的桥梁
- 属于结构型模式,它结合了两个独立接口的功能。
意图:
将一个类的接口转换成客户希望的另外一个接口。适配器模式使得原本由于接口不兼容而不能一起工作的那些类可以一起工作。
主要解决:
主要解决在软件系统中,常常要将一些”现存的对象”放到新的环境中,而新环境要求的接口是现对象不能满足的。
如何解决:
继承或依赖(推荐)。
关键代码:
适配器继承或依赖已有的对象,实现想要的目标接口。
应用实例:
- 美国电器 110V,中国 220V,就要有一个适配器将 110V 转化为 220V
- JAVA JDK 1.1 提供了 Enumeration 接口,而在 1.2 中提供了 Iterator 接口,想要使用 1.2 的 JDK,则要将以前系统的 Enumeration 接口转化为 Iterator 接口,这时就需要适配器模式
- 在 LINUX 上运行 WINDOWS 程序
- JAVA 中的 jdbc。
优点:
可以让任何两个没有关联的类一起运行
提高了类的复用
- 增加了类的透明度
- 灵活性好。
缺点:
- 过多地使用适配器,会让系统非常零乱,不易整体进行把握
- 由于 JAVA 至多继承一个类,所以至多只能适配一个适配者类,而且目标类必须是抽象类。
使用场景:
有动机地修改一个正常运行的系统的接口,这时应该考虑使用适配器模式。
注意事项:
适配器不是在详细设计时添加的,而是解决正在服役的项目的问题。
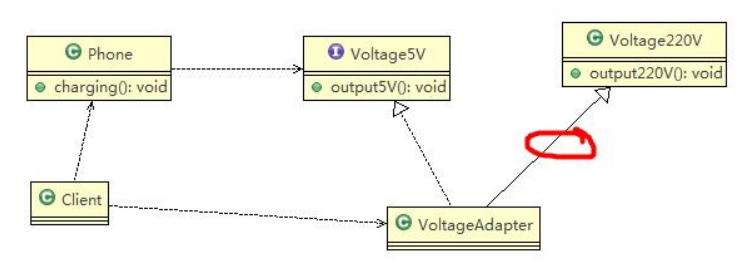
类适配器模式
基本介绍
Adapter 类,通过继承 src 类,实现 dst 类接口,完成 src->dst 的适配。
示例
以生活中充电器的例子来讲解适配器,充电器本身相当于 Adapter,220V 交流电相当于src (即被适配者),我们的目标dst是 5V 直流电
1
2
3
4
5
6
7
8
9
10
11
12
13
14
15
16
17
18
19
20
21
22
23
24
25
26
27
28
29
30
31
32
33
34
35
36
37
38
39
40
41
42
43
44
|
public class Voltage220V {
public int output220V() {
int src = 220;
System.out.println("电压=" + src + "伏");
return src;
}
}
public class VoltageAdapter extends Voltage220V implements IVoltage5V {
@Override
public int output5V() {
int srcV = output220V();
int dstV = srcV / 44 ;
return dstV;
}
}
public interface IVoltage5V {
public int output5V();
}
public class Phone {
public void charging(IVoltage5V iVoltage5V) {
if(iVoltage5V.output5V() == 5) {
System.out.println("电压为 5V, 可以充电~~");
} else if (iVoltage5V.output5V() > 5) {
System.out.println("电压大于 5V, 不能充电~~");
}
}
}
public class Client {
public static void main(String[] args) {
System.out.println(" === 类适配器模式 ====");
Phone phone = new Phone();
phone.charging(new VoltageAdapter());
}
}
|
注意事项和细节
- Java 是单继承机制,所以类适配器需要继承 src 类这一点算是一个缺点, 因为这要求dst 必须是接口,有一定局限性
- src 类的方法在 Adapter 中都会暴露出来,也增加了使用的成本。
- 由于其继承了 src 类,所以它可以根据需求重写 src 类的方法,使得 Adapter 的灵活性增强了。
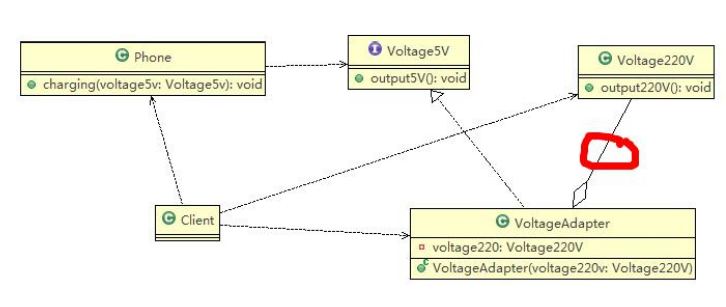
对象适配器模式
基本介绍
- 基本思路和类的适配器模式相同,只是将 Adapter 类作修改,不是继承 src 类,而是持有src 类的实例,以解决兼容性的问题。 即:持有 src 类,实现 dst 类接口,完成 src->dst 的适配
- 根据“合成复用原则”,在系统中尽量使用关联关系(聚合)来替代继承关系。
- 对象适配器模式是适配器模式常用的一种
示例
以生活中充电器的例子来讲解适配器,充电器本身相当于 Adapter,220V 交流电相当于src (即被适配者),我们的目标 dst是 5V 直流电,使用对象适配器模式完成。
只需修改适配器即可, 如下:
1
2
3
4
5
6
7
8
9
10
11
12
13
14
15
16
17
18
19
20
21
22
23
24
25
26
27
28
29
30
31
32
33
34
35
36
37
38
39
40
41
42
43
44
45
46
47
48
49
50
51
52
|
public class Voltage220V {
public int output220V() {
int src = 220;
System.out.println("电压=" + src + "伏");
return src;
}
}
public interface IVoltage5V {
public int output5V();
}
public class VoltageAdapter implements IVoltage5V {
private Voltage220V voltage220V;
public VoltageAdapter(Voltage220V voltage220v) {
this.voltage220V = voltage220v;
}
@Override
public int output5V() {
int dst = 0;
if(null != voltage220V) {
int src = voltage220V.output220V();
System.out.println("使用对象适配器,进行适配~~");
dst = src / 44;
System.out.println("适配完成,输出的电压为=" + dst);
}
return dst;
}
}
public class Phone {
public void charging(IVoltage5V iVoltage5V) {
if(iVoltage5V.output5V() == 5) {
System.out.println("电压为 5V, 可以充电~~");
} else if (iVoltage5V.output5V() > 5) {
System.out.println("电压大于 5V, 不能充电~~");
}
}
}
public class Client {
public static void main(String[] args) {
System.out.println(" === 对象适配器模式 ====");
Phone phone = new Phone();
phone.charging(new VoltageAdapter(new Voltage220V()));
}
}
|
注意事项和细节
- 对象适配器和类适配器其实算是同一种思想,只不过实现方式不同。 根据合成复用原则,使用组合替代继承, 所以它解决了类适配器必须继承 src 的局限性问题,也不再要求dst 必须是接口
- 使用成本更低,更灵活
接口适配器模式
基本介绍
- 适配器模式(Default Adapter Pattern)或缺省适配器模式。
- 当不需要全部实现接口提供的方法时,可先设计一个抽象类实现接口,并为该接口中每个方法提供一个默认实现(空方法),那么该抽象类的子类可有选择地覆盖父类的某些方法来实现需求
- 适用于一个接口不想使用其所有的方法的情况
1
2
3
4
5
6
7
8
9
10
11
12
13
14
15
16
17
18
19
20
21
22
23
24
25
26
27
28
29
30
31
32
| public interface Interface4 {
public void m1();
public void m2();
public void m3();
public void m4();
}
public abstract class AbsAdapter implements Interface4 {
public void m1() {
}
public void m2() {
}
public void m3() {
}
public void m4() {
}
}
public class Client {
public static void main(String[] args) {
AbsAdapter absAdapter = new AbsAdapter() {
@Override
public void m1() {
System.out.println("使用了 m1 的方法");
}
};
absAdapter.m1();
}
}
|
媒体案例
有一个 MediaPlayer 接口和一个实现了 MediaPlayer 接口的实体类 AudioPlayer。默认情况下,AudioPlayer 可以播放 mp3 格式的音频文件。
我们还有另一个接口 AdvancedMediaPlayer 和实现了 AdvancedMediaPlayer 接口的实体类。该类可以播放 vlc 和 mp4 格式的文件。
我们想要让 AudioPlayer 播放其他格式的音频文件。为了实现这个功能,我们需要创建一个实现了 MediaPlayer 接口的适配器类 MediaAdapter,并使用 AdvancedMediaPlayer 对象来播放所需的格式。
AudioPlayer 使用适配器类 MediaAdapter 传递所需的音频类型,不需要知道能播放所需格式音频的实际类。AdapterPatternDemo 类使用 AudioPlayer 类来播放各种格式。

为媒体播放器和更高级的媒体播放器创建接口。
1
2
3
4
5
6
7
8
| public interface MediaPlayer {
public void play(String audioType, String fileName);
}
public interface AdvancedMediaPlayer {
public void playVlc(String fileName);
public void playMp4(String fileName);
}
|
创建实现了 AdvancedMediaPlayer 接口的实体类。
1
2
3
4
5
6
7
8
9
10
11
12
13
14
15
16
17
18
19
20
21
22
23
24
| public class VlcPlayer implements AdvancedMediaPlayer{
@Override
public void playVlc(String fileName) {
System.out.println("Playing vlc file. Name: "+ fileName);
}
@Override
public void playMp4(String fileName) {
}
}
public class Mp4Player implements AdvancedMediaPlayer{
@Override
public void playVlc(String fileName) {
}
@Override
public void playMp4(String fileName) {
System.out.println("Playing mp4 file. Name: "+ fileName);
}
}
|
创建实现了 MediaPlayer 接口的适配器类。
1
2
3
4
5
6
7
8
9
10
11
12
13
14
15
16
17
18
19
20
21
| public class MediaAdapter implements MediaPlayer {
AdvancedMediaPlayer advancedMusicPlayer;
public MediaAdapter(String audioType){
if(audioType.equalsIgnoreCase("vlc") ){
advancedMusicPlayer = new VlcPlayer();
} else if (audioType.equalsIgnoreCase("mp4")){
advancedMusicPlayer = new Mp4Player();
}
}
@Override
public void play(String audioType, String fileName) {
if(audioType.equalsIgnoreCase("vlc")){
advancedMusicPlayer.playVlc(fileName);
}else if(audioType.equalsIgnoreCase("mp4")){
advancedMusicPlayer.playMp4(fileName);
}
}
}
|
创建实现了 MediaPlayer 接口的实体类。
1
2
3
4
5
6
7
8
9
10
11
12
13
14
15
16
17
18
19
20
21
22
| public class AudioPlayer implements MediaPlayer {
MediaAdapter mediaAdapter;
@Override
public void play(String audioType, String fileName) {
if(audioType.equalsIgnoreCase("mp3")){
System.out.println("Playing mp3 file. Name: "+ fileName);
}
else if(audioType.equalsIgnoreCase("vlc")
|| audioType.equalsIgnoreCase("mp4")){
mediaAdapter = new MediaAdapter(audioType);
mediaAdapter.play(audioType, fileName);
}
else{
System.out.println("Invalid media. "+
audioType + " format not supported");
}
}
}
|
使用 AudioPlayer 来播放不同类型的音频格式。
1
2
3
4
5
6
7
8
9
10
| public class AdapterPatternDemo {
public static void main(String[] args) {
AudioPlayer audioPlayer = new AudioPlayer();
audioPlayer.play("mp3", "beyond the horizon.mp3");
audioPlayer.play("mp4", "alone.mp4");
audioPlayer.play("vlc", "far far away.vlc");
audioPlayer.play("avi", "mind me.avi");
}
}
|
注意事项