Eureka 基础知识
服务治理
Spring Cloud封装 了Netfilx开发的Eureka模块实现服务治理
传统RPC远程调用框架中,管理服务之间依赖关系较为复杂,因此使用服务治理管理该关系,可以实现服务调用、负载均衡、容错等,实现服务发现与注册
服务注册与发现
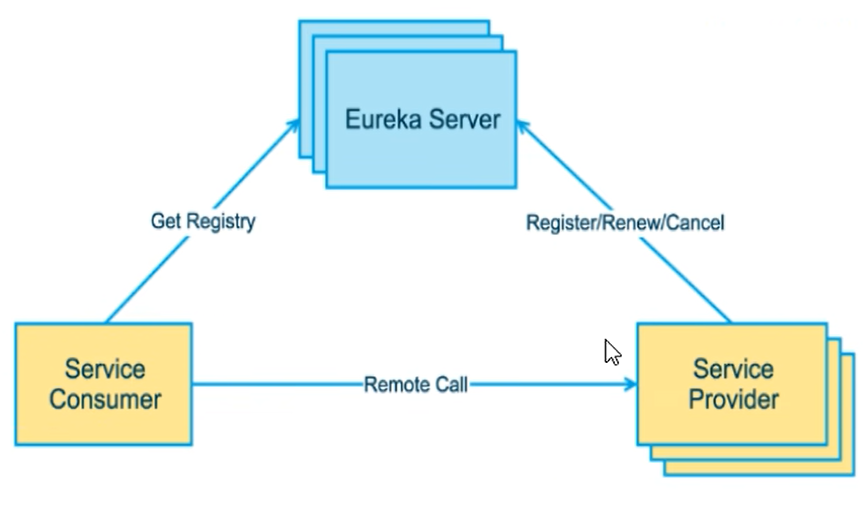
Eureka采用C/S设计架构,Eureka Server作为服务注册功能的服务器,属于服务注册中心,而系统中其他微服务,使用Eureka的客户端连接到Eureka Server并维持心跳连接,这样系统的维护人员可以通过Eureka Server来监控系统中各个微服务是否正常运行
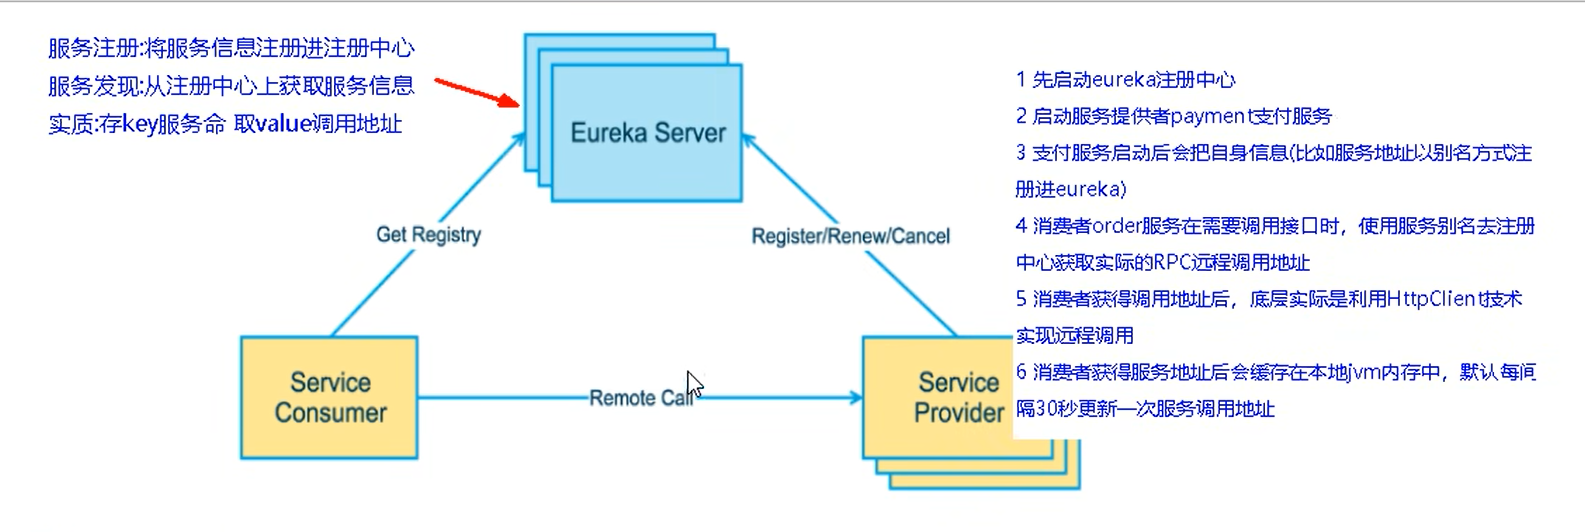
在服务注册发现中,有一个注册中心 。当服务器启动时,会把当前主机服务器的信息(如服务器地址、通讯地址等)以别名方式注册到注册中心上,另一方(消费者|服务提供者),以该别名方式去注册中心获取实际的服务通讯地址,然后实现本地RPC调用
Eureka两个组件:Eureka Server和Eureka Client
Eureka Server 提供服务注册
每个微服务节点启动后,会在Eureka Server中进行注册,Eureka Server的服务注册表将会存储所有可用服务节点的信息
Eureka Client 通过注册中心进行访问
用于简化Eureka Server的交互,客户端同时具备内置的、使用轮询负载算法的负载均衡器。应用启动后,将向Eureka Server发送心跳(默认周期30s)
若Eureka Server在多个心跳周期内没有接收到某个节点的心跳,Eureka Server将会从服务注册表中把这个服务节点移除(默认90s)
单机 Eureka 构建 Eureka Server 1.创建模块cloud-eureka-server-7001
2.引入依赖
lombok
spring-boot-starter-web
spring-boot-starter-actuator
spring-boot-starter-test
3.配置YML
1
2
3
4
5
6
7
8
9
10
11
server: port: 7001 eureka: instance: hostname: localhost client: register-with-eureka: false fetch-registry: false service-url: defaultZone: http://${eureka.instance.hostname}:${server.port}/eureka/
4.添加主启动
1
2
3
4
5
6
7
8
@SpringBootApplication @EnableEurekaServer public class EurekaMain7001 { public static void main (String[] args) { SpringApplication.run(EurekaMain7001.class, args); } }
访问http://localhost:7001/,测试成功
支付微服务8001注册进Eureka Server
备注:将cloud-provider-payment-8001入驻Eureka Server成为服务提供者 provider
1.引入pom
spring-cloud-starter-netflix-eureka-client
2.配置YML
1
2
3
4
5
6
eureka: client: register-with-eureka: true fetch-registry: true service-url: defaultZone: http://localhost:7001/eureka
3.添加主启动
1
2
3
4
5
6
7
@SpringBootApplication @EnableEurekaClient public class PaymentMain8001 { public static void main (String[] args) { SpringApplication.run(PaymentMain8001.class, args); } }
4.测试
先启动Eureka Server
http://localhost:7001
订单微服务80注册进 Eureka Server 备注:
将cloud-consumer-order-80入驻Eureka Server成为服务消费者consumer
1.引入pom
spring-cloud-starter-netflix-eureka-client
2.配置YML
1
2
3
4
5
6
7
8
9
10
11
12
13
server: port: 80 spring: application: name: cloud-order-service eureka: client: register-with-eureka: true fetch-registry: true service-url: defaultZone: http://localhost:7001/eureka
3.添加主启动
1
2
3
4
5
6
7
8
@SpringBootApplication @EnableEurekaClient public class OrderMain80 { public static void main (String[] args) { SpringApplication.run(OrderMain80.class, args); } }
4.测试
先启动Eureka Server 7001服务
http://localhost:7001 再启动服务提供者provider 8001服务
集群 Eureka 构建
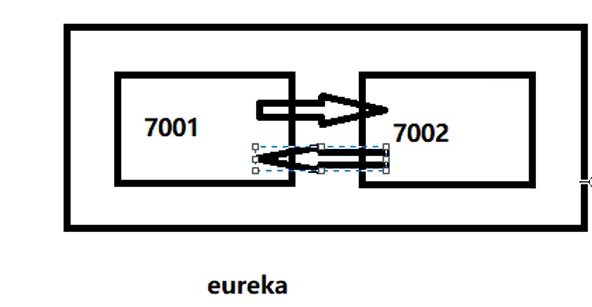
Eureka集群原理
微服务RPC远程服务调用的最核心是什么?
互相注册,相互守望
1.新建cloud-eureka-server-7002
2.引入依赖
3.修改Windows下host映射配置
找到C:\Windows\System32\drivers\etc\hosts文件
修改映射配置,并添加进hosts文件
1
2
3
127.0.0.1 eureka7001.com 127.0.0.1 eureka7002.com
4.配置YML
7001
1
2
3
4
5
6
7
8
9
10
11
server: port: 7001 eureka: instance: hostname: eureka7001.com client: register-with-eureka: false fetch-registry: false service-url: defaultZone: http://eureka7002.com:7002/eureka/
7002
1
2
3
4
5
6
7
8
9
10
11
12
server: port: 7002 eureka: instance: hostname: eureka7002.com client: register-with-eureka: false fetch-registry: false service-url: defaultZone: http://eureka7001.com:7001/eureka/
5.添加主启动
1
2
3
4
5
6
7
8
@SpringBootApplication @EnableEurekaClient public class EurekaMain7002 { public static void main (String[] args) { SpringApplication.run(EurekaMain7002.class, args); } }
6.测试
访问http://eureka7001.com:7001/
访问http://eureka7002.com:7002/
订单支付微服务注册进Eureka集群 支付服务8001微服务注册进集群 1 2 3 4 5 6 7 8 eureka: client: register-with-eureka: true fetch-registry: true service-url: defaultZone: http://eureka7001.com:7001/eureka,http://eureka7002.com:7002/eureka
订单服务80微服务注册进集群 1 2 3 4 5 6 7 8 eureka: client: register-with-eureka: true fetch-registry: true service-url: defaultZone: http://eureka7001.com:7001/eureka,http://eureka7002.com:7002/eureka
支付微服务集群构建 1.新建工程cloud-provider-payment-8002
2.引入依赖
3.配置yml
1 2 3 4 5 6 7 8 9 10 11 12 13 14 15 16 17 18 19 20 21 22 23 24 25 server: port: 8002 spring: application: name: cloud-payment-service datasource: type: com.alibaba.druid.pool.DruidDataSource driver-class-name: org.gjt.mm.mysql.Driver url: jdbc:mysql://localhost:3306/db2019?useUnicode=true&characterEncoding=utf-8&useSSL=false username: root password: root eureka: client: register-with-eureka: true fetch-registry: true service-url: defaultZone: http://eureka7001.com:7001/eureka,http://eureka7002.com:7002/eureka mybatis: mapper-locations: classpath:mapper/*.xml type-aliases-package: com.cyan.springcloud.entities
4.添加主启动
1 2 3 4 5 6 7 8 @SpringBootApplication @EnableEurekaClient public class PaymentMain8002 { public static void main (String[] args) { SpringApplication.run(PaymentMain8002.class, args); } }
5.测试
http://localhost:7001/
http://localhost:7002/
8.负载均衡
订单服务访问地址不能写死
1 2 3 4 public static final String PAYMENT_URL = "http://CLOUD-PAYMENT-SERVICE" ;
使用@LoadBalanced注解赋予RestTemplate负载均衡能力
1 2 3 4 5 6 7 8 9 10 @Configuration public class ApplicationContextConfig { @Bean @LoadBalanced public RestTemplate getRestTemplate () { return new RestTemplate (); } }
9.再次测试
a. 启动EurekaServer(7001、7002)
b. 再启动服务提供者(8001、8002)
c. http://localhost/consumer/payment/get/1
d. 负载均衡达到:8001和8002交替出现
Ribbon和Eureka整合后Consumer可以直接调用服务,无需关心地址和端口号
actuator微服务信息完善
主机名称:服务名称修改
修改cloud-provider-payment-8001的YML
1 2 3 4 5 6 7 8 9 10 eureka: client: register-with-eureka: true fetch-registry: true service-url: defaultZone: http://eureka7001.com:7001/eureka,http://eureka7002.com:7002/eureka instance: instance-id: payment8001
访问信息有IP提示信息
1 2 3 4 5 6 7 8 9 10 11 eureka: client: register-with-eureka: true fetch-registry: true service-url: defaultZone: http://eureka7001.com:7001/eureka,http://eureka7002.com:7002/eureka instance: instance-id: payment8001 prefer-ip-address: true
服务发现 对于注册进Eureka里的微服务,可以通过服务发现 来获得该服务的信息
1.在8001中注入依赖
1 2 3 @Resource private DiscoveryClient discoveryClient;
2.测试代码
1 2 3 4 5 6 7 8 9 10 11 12 13 14 15 16 @GetMapping("/discovery") public Object discovery () { List<String> services = discoveryClient.getServices(); for (String element : services) { log.info("*****element: " +element); } List<ServiceInstance> instances = discoveryClient.getInstances("CLOUD-PAYMENT-SERVICE" ); for (ServiceInstance instance : instances) { log.info(instance.getServiceId()+"\t" +instance.getHost()+"\t" +instance.getPort()+"\t" +instance.getUri()); } return this .discoveryClient; }
3.开启支持
1 2 3 4 5 6 7 8 9 @SpringBootApplication @EnableEurekaClient @EnableDiscoveryClient public class PaymentMain8001 { public static void main (String[] args) { SpringApplication.run(PaymentMain8001.class, args); } }
4.测试
启动EurekaServer
启动8001主启动类
访问http://localhost:8001/payment/discovery
1 2 {"services":["cloud-payment-service","cloud-order-service"],"order":0}
Eureka自我保护
保护模式
保护模式主要用于一组客户端和Eureka Server之间存在网格分区场景下的保护,一旦进入保护模式,Eureka Server将会尝试保护其服务注册表中的信息 ,不再删除服务注册表中的数据,也就不会注销任何微服务
自我保护机制原因
为了EurekaClient可以正常运行,防止与EurekaServer网络不通情况下,EurekaServer不会立刻将EurekaClient服务剔除
自我保护模式
默认情况,如果Eureka‘Server在一定时间内没有接收到某个微服务实例的心跳,EurekaServer会注销该实例(默认90s)。但当网络分区故障发生时,微服务与EurekaServer之间无法正常通信,以上行为可能变得非常危险(微服务本身正常的,无需注销微服务)。Eureka通过“自我保护“模式解决—当EurekaServer节点在短时间内丢失过多客户端时(网络分区故障等),那么该节点进入自我保护模式
在自我保护模式下,EurekaServer会保护服务注册表中的信息,不再注销任何服务实例
禁止自我保护
默认情况,自我保护机制开启的,使用下述配置关闭自我保护
1 2 eureka.server.enable-self-preservation =false
Zookeeper 注册中心 Zookeeper
介绍
zookeeper是分布式协调工具,可以实现注册中心功能
关闭Linux服务器防火墙后启动zookeeper服务器
1 2 3 systemctl stop firewalld systemctl status firewalld
服务提供者 1.新建cloud-provider-payment-8003
2.引入依赖
spring-cloud-starter-zookeeper-discovery
3.配置YML
1 2 3 4 5 6 7 8 9 10 server: port: 8003 spring: application: name: cloud-provider-payment cloud: zookeeper: connect-string: 192.168 .111 :2181
4.添加主启动
1 2 3 4 5 6 7 8 9 @SpringBootApplication @EnableDiscoveryClient public class PaymentMain8004 { public static void main (String[] args) { SpringApplication.run(PaymentMain8004.class, args); } }
5.处理控制器
1 2 3 4 5 6 7 8 9 10 11 12 13 14 15 @Slf4j @RestController @RequestMapping("/payment") public class PaymentController { @Value("${server.port}") private String serverPort; @RequestMapping("/zk") public String paymentzk () { return "SpringCloud with Zookeeper: " + serverPort + "\t" + UUID.randomUUID().toString(); } }
服务消费者 1.新建cloud-consumerzk-order-80
2.引入依赖
lombok
spring-boot-starter-web
spring-boot-starter-test
1 2 3 4 5 6 7 8 9 10 11 12 13 14 15 16 17 18 19 20 <dependency > <groupId > org.springframework.cloud</groupId > <artifactId > spring-cloud-starter-zookeeper-discovery</artifactId > <exclusions > <exclusion > <groupId > org.apache.zookeeper</groupId > <artifactId > zookeeper</artifactId > </exclusion > </exclusions > </dependency > <dependency > <groupId > org.apache.zookeeper</groupId > <artifactId > zookeeper</artifactId > <version > 3.4.9</version > </dependency >
3.配置YML
1 2 3 4 5 6 7 8 9 10 server: port: 80 spring: application: name: cloud-consumer-order cloud: zookeeper: connect-string: 192.168 .111 .144 :2181
4.添加主启动
1 2 3 4 5 6 7 8 9 10 @SpringBootApplication @EnableDiscoveryClient public class OrderZKMain80 { public static void main (String[] args) { SpringApplication.run(OrderZKMain80.class, args); } }
5.处理业务
1 2 3 4 5 6 7 8 9 10 11 12 13 14 15 16 17 @Slf4j @RestController @RequestMapping("/consumer") public class OrderZKController { public static final String INVOKE_URL = "http://cloud-provider-payment" ; @Resource private RestTemplate restTemplate; @GetMapping("/payment/zk") public String paymentInfo () { String result = restTemplate.getForObject(INVOKE_URL + "/payment/zk" , String.class); return result; } }
Consul Consul简介
Consul is a service networking solution that enables teams to manage secure network connectivity between services and across multi-cloud environments and runtimes. Consul offers service discovery, identity-based authorization, L7 traffic management, and service-to-service encryption.
Consul 是一套开源的分布式服务发现和配置管理系统,提供了微服务系统中的服务治理、配置中心、控制总线等功能,这些功能可以单独使用,可以一起使用构建服务网格,它提供了一种完整的服务网格解决方案
优点
基于raft协议,比较简洁
支持健康检查,同时支持HTTP和DNS协议
支持数据中心的WAN集群
提供图形化界面,并且跨平台
Consul功能
服务发现:提供HTTP和DNS两种发现方式
健康监测:支持多种方式(HTTP、TCP、Docker、Shell脚本定制化)
KV存储:Key、Value的存储方式
多数据中心:Consul支持多数据中心
可视化界面
Spring Cloud Consul
使用教程
服务提供者 1.新建支付服务cloud-provider-consul-payment-8006
2.引入pom
spring-cloud-starter-consul-discovery
spring-boot-starter-web
spring-boot-starter-actuator
spring-boot-starter-test
3.配置YML
1 2 3 4 5 6 7 8 9 10 11 12 13 server: port: 8006 spring: application: name: consul-provider-payment cloud: consul: host: localhost port: 8500 discovery: service-name: ${spring.application.name}
4.添加主启动
1 2 3 4 5 6 7 8 9 @SpringBootApplication @EnableDiscoveryClient public class PaymentMain8006 { public static void main (String[] args) { SpringApplication.run(PaymentMain8006.class, args); } }
5.处理业务
1 2 3 4 5 6 7 8 9 10 11 12 13 14 @Slf4j @RestController @RequestMapping("/payment") public class PaymentController { @Value("${server.port}") private String serverPort; @RequestMapping("/consul") public String paymentConsul () { return "Spring Cloud with Consul: " + serverPort + "\t" + UUID.randomUUID().toString(); } }
6.测试
服务消费者 1.新建订单服务cloud-consumer-consul-order-80
2.引入pom
spring-cloud-starter-consul-discovery
spring-boot-starter-web
spring-boot-starter-actuator
spring-boot-starter-test
3.配置YML
1 2 3 4 5 6 7 8 9 10 11 12 13 server: port: 80 spring: application: name: cloud-consumer-order cloud: consul: host: localhost port: 8500 discovery: service-name: ${spring.application.name}
4.添加主启动
1 2 3 4 5 6 7 8 @SpringBootApplication @EnableDiscoveryClient public class OrderConsulMain80 { public static void main (String[] args) { SpringApplication.run(OrderConsulMain80.class, args); } }
5.添加配置
1 2 3 4 5 6 7 8 9 10 @Configuration public class ApplicationContextConfig { @Bean @LoadBalanced public RestTemplate getRestTemplate () { return new RestTemplate (); } }
6.处理业务
1 2 3 4 5 6 7 8 9 10 11 12 13 14 15 16 17 18 @Slf4j @RestController @RequestMapping("/consumer") public class OrderConsulController { public static final String INVOKE_URL = "http://consul-provider-payment" ; @Resource private RestTemplate restTemplate; @GetMapping("/payment/consul") public String paymentInfo () { String result = restTemplate.getForObject(INVOKE_URL + "/payment/consul" , String.class); return result; } }
7.测试
注册中心总结
组件名
语言
CAP
服务健康检查
对外接口暴露
SpringCloud集成
Eureka
Java
AP
可配支持
HTTP
已集成
Consul
Go
CP
支持
HTTP/DNS
已集成
Zookeeper
Java
CP
支持
客户端
已集成
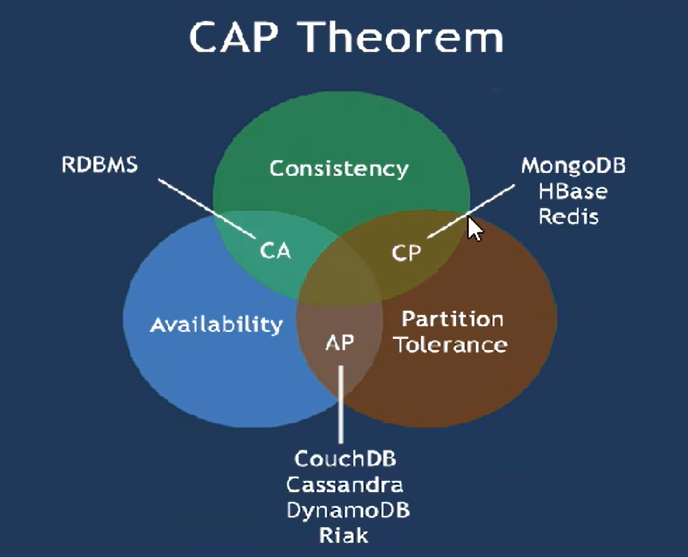
CAP
C:Consistency 强一致性
A:Availability 可用性
P:Partition tolerance 分区容错性
CAP理论关注粒度是数据
经典CAP图
最多只能同时较好满足两个
CAP理论核心:一个分布式系统不可能同时很好满足一致性,可用性和分区容错性三个需求
根据CAP原理将NoSQL数据库分成满足CA原则、P原则、AP原则:
CA :单点集群,满足一致性、可用性的分布式系统,通常在可扩展性上不太强大
CP :满足一致性,分区容忍性的系统,通常性能不是特别高
AP :满足可用性,分区容忍性的系统,通常可能对一致性要求低一些


