在本篇文章中,我们将向多个消费者中发送一条消息,该模式称为“publish/subscribe”。
我们将搭建简易日志系统,由发布日志信息和接收日志信息功能组成。在我们的日志系统中,接收程序的每个运行副本都会收到消息。这样,我们就能运行一个接收器,并将日志导入磁盘;同时,我们也能运行另一个接收器,并在屏幕上看到日志。发布的日志信息将广播给所有接收器。
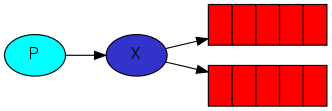
Exchanges RabbitMQ 消息传递模型的核心思想是,生产者从不直接向队列发送任何消息。实际上,很多时候,生产者甚至不知道消息是否会被传送到任何队列。
相反,生产者只能将消息发送到 exchange 中,它的一端接收来自生产者的信息,另一端将信息推送到队列。exchange 必须清楚地知道如何处理收到的信息。
There are a few exchange types available: direct, topic, headers and fanout.
我们将使用fanout,并将其命名为logs,它只是将收到的所有消息广播到它知道的所有队列
1 channel.exchangeDeclare("logs" , "fanout" );
Listing exchanges
To list the exchanges on the server you can run the ever useful rabbitmqctl:
1 sudo rabbitmqctl list_exchanges
Nameless exchange
n previous parts of the tutorial we knew nothing about exchanges, but still were able to send messages to queues. That was possible because we were using a default exchange, which we identify by the empty string (“”).
Recall how we published a message before:
1 channel.basicPublish("" , "hello" , null , message.getBytes());
The first parameter is the name of the exchange. The empty string denotes the default or nameless exchange: messages are routed to the queue with the name specified by routingKey, if it exists
现在我们可以使用我自己命名的exchange进行发布消息
1 channel.basicPublish( "logs" , "" , null , message.getBytes());
Temporary queues 我们需要将任务送入一个队列,在生产者和消费者之间共享队列时,给队列命名非常重要
但我们的日志记录器并非如此。我们希望听到所有日志信息,而不仅仅是其中的一个子集。我们还只对当前的日志信息感兴趣,而不是旧的日志信息。要解决这个问题,我们需要两样东西。
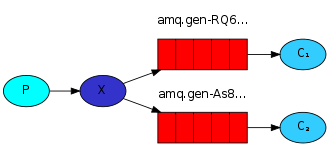
每当连接 Rabbit 时,我们都需要一个全新的空队列。为此,我们可以创建一个具有随机名称的队列,或者,更好的办法是让服务器为我们选择一个随机的队列名称。
一旦我们断开消费者连接,队列就会自动删除
在 Java 中,当我们向 queueDeclare() 提供空参时,会创建一个非持久、独占、自动删除的队列,并生成一个名称:
1 String queueName = channel.queueDeclare().getQueue();
Bindings
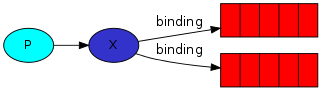
我们已经创建了一个fanout exchange和一个临时队列,现在我们需要让交换机将消息发送至队列中,交换和队列之间的这种关系称为 binding .
1 channel.queueBind(queueName, "logs" , "" );
Listing bindings
You can list existing bindings using, you guessed it,
1 rabbitmqctl list_bindings
Putting it all together
与之前文章中代码不同的是,我们将使用自己命名的交换机发送消息而不是无名的交换机,我们在发送消息时需要提供routingKey
1
2
3
4
5
6
7
8
9
10
11
12
13
14
15
16
17
18
19
public class EmitLog { private static final String EXCHANGE_NAME = "logs" ; public static void main (String[] argv) throws Exception { ConnectionFactory factory = new ConnectionFactory (); factory.setHost("localhost" ); try (Connection connection = factory.newConnection(); Channel channel = connection.createChannel()) { channel.exchangeDeclare(EXCHANGE_NAME, "fanout" ); String message = argv.length < 1 ? "info: Hello World!" : String.join(" " , argv); channel.basicPublish(EXCHANGE_NAME, "" , null , message.getBytes("UTF-8" )); System.out.println(" [x] Sent '" + message + "'" ); } } }
建立连接后,我们声明了交换机,因为不允许向不存在的交换机发送消息。如果没有队列绑定到交换机,消息就会丢失,如果还没有消费者在监听,我们就可以安全地丢弃消息
1
2
3
4
5
6
7
8
9
10
11
12
13
14
15
16
17
18
19
20
21
22
public class ReceiveLogs { private static final String EXCHANGE_NAME = "logs" ; public static void main (String[] argv) throws Exception { ConnectionFactory factory = new ConnectionFactory (); factory.setHost("localhost" ); Connection connection = factory.newConnection(); Channel channel = connection.createChannel(); channel.exchangeDeclare(EXCHANGE_NAME, "fanout" ); String queueName = channel.queueDeclare().getQueue(); channel.queueBind(queueName, EXCHANGE_NAME, "" ); System.out.println(" [*] Waiting for messages. To exit press CTRL+C" ); DeliverCallback deliverCallback = (consumerTag, delivery) -> { String message = new String (delivery.getBody(), "UTF-8" ); System.out.println(" [x] Received '" + message + "'" ); }; channel.basicConsume(queueName, true , deliverCallback, consumerTag -> { }); } }
Spring AMQP 我们将使用 Spring Boot 来引导和配置 Spring AMQP 项目,代码仓库链接 ,与往常一样,配置类如下
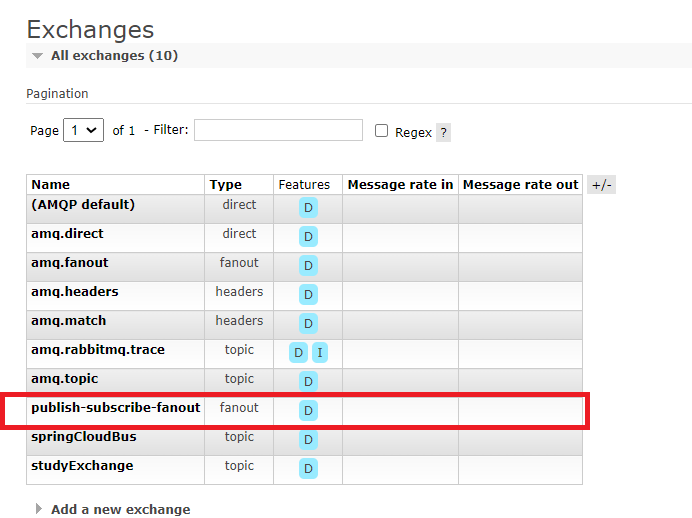
1
2
3
4
5
6
7
8
9
10
11
12
13
14
15
16
17
18
19
20
21
22
23
24
25
26
27
28
@Configuration public class RabbitMQConfig { @Bean public Queue autoDeleteQueue1 () { return new AnonymousQueue (); } @Bean public Binding binding1 (FanoutExchange fanout, Queue autoDeleteQueue1) { return BindingBuilder.bind(autoDeleteQueue1).to(fanout); } @Bean public Queue autoDeleteQueue2 () { return new AnonymousQueue (); } @Bean public Binding binding2 (FanoutExchange fanout, Queue autoDeleteQueue2) { return BindingBuilder.bind(autoDeleteQueue2).to(fanout); } @Bean public FanoutExchange fanoutExchange () { return new FanoutExchange ("publish-subscribe-fanout" ); } }
消息发送
1
2
3
4
5
6
7
8
9
10
11
12
13
14
15
@Service public class PublishSubscribeSenderServiceImpl implements PublishSubscribeSenderService { @Autowired private RabbitTemplate rabbitTemplate; @Autowired private FanoutExchange fanout; @Override public void send (String message) { rabbitTemplate.convertAndSend(fanout.getName(), "" , message); System.out.println(" ********************* [x] Sent '" + message + "exchange is " + fanout.getName()); } }
消息监听
1
2
3
4
5
6
7
8
9
10
11
12
13
14
15
@Component public class PublishSubscribeReceiver { @RabbitListener(queues = "#{autoDeleteQueue1.name}") public void receive1 (String in) { System.out.println("receive1: " + in); } @RabbitListener(queues = "#{autoDeleteQueue2.name}") public void receive2 (String in) { System.out.println("receive2: " + in); } }
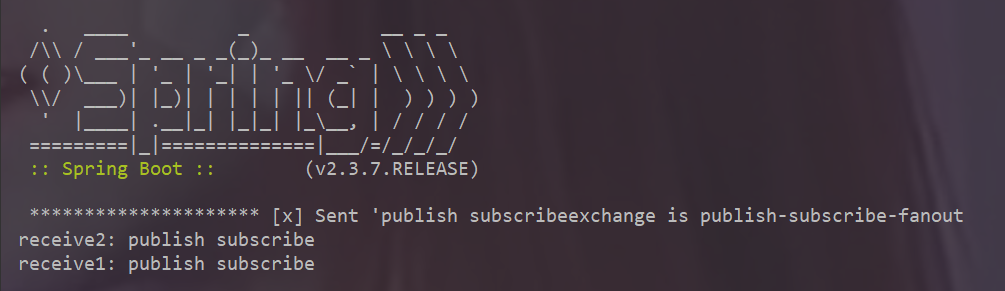
使用http client发送请求,测试结果如下
1
2
# PublishSubscribe 测试 GET { { publish_subscribe_host} } /amqp/send?message=publish subscribe