在本篇中我们将使用 RabbitMQ 构建一个 RPC 系统:一个客户端和一个可扩展的 RPC 服务器。由于我们没有任何值得分发的耗时任务,因此我们将创建一个返回斐波那契数字的虚拟 RPC 服务。
Client interface
为了说明如何使用 RPC 服务,我们将创建一个简单的客户端类。它将公开一个名为 call的方法,该方法发送 RPC 请求并阻塞,直到收到应答为止:
1
2
3
| FibonacciRpcClient fibonacciRpc = new FibonacciRpcClient();
String result = fibonacciRpc.call("4");
System.out.println( "fib(4) is " + result);
|
Callback queue
一般来说,通过 RabbitMQ 进行 RPC 非常简单。客户端发送请求消息,服务器回复响应消息。为了接收响应,我们需要随请求发送一个callback队列地址。我们可以使用默认队列。
1
2
3
4
5
6
7
8
9
10
| callbackQueueName = channel.queueDeclare().getQueue();
BasicProperties props = new BasicProperties
.Builder()
.replyTo(callbackQueueName)
.build();
channel.basicPublish("", "rpc_queue", props, message.getBytes());
|
Message properties
AMQP 0-9-1 协议预定义了一组 14 个属性,与消息一起使用。除以下属性外,大多数属性都很少使用:
| 属性 |
说明 |
| deliveryMode |
将信息标记为持久性(值为 2)或短暂性(任何其他值) |
| contentType |
用于描述编码的 mime 类型。例如,对于常用的 JSON 编码,最好将此属性设置为:application/json |
| replyTo |
常用于命名回调队列 |
| correlationId |
用于关联 RPC 响应和请求 |
Correlation Id
在上面介绍的方法中,我们建议为每个 RPC 请求创建一个回调队列。这样做效率很低,有一个更好的方法—让我们为每个客户端创建一个回调队列。这就产生了一个新问题,即在该队列中收到一个响应后,不清楚该响应属于哪个请求。这时就需要使用 correlationId 属性。
我们将为每个请求设置一个唯一的值。稍后,当我们在回调队列中收到一条消息时,我们将查看该属性,并根据它来匹配响应和请求。
Summary
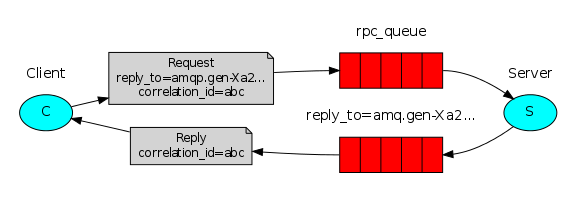
- 对于一个 RPC 请求,客户端会发送一条带有两个属性的消息:
replyTo(设置为专为该请求创建的匿名专属队列)和 correlationId(设置为每个请求的唯一值)。
- 请求会被发送到一个
rpc_queue 队列。
- RPC Worker(服务器)在队列中等待请求。当出现请求时,服务器会执行任务,并使用
replyTo 字段中的队列将结果发送回客户端。
- 客户端在回复队列中等待数据。当信息出现时,它会检查
correlationId 属性。如果与请求中的值相匹配,就会向应用程序返回响应。
Putting it all together
The Fibonacci task:
1
2
3
4
5
| private static int fib(int n) {
if (n == 0) return 0;
if (n == 1) return 1;
return fib(n-1) + fib(n-2);
}
|
RPCServer
1
2
3
4
5
6
7
8
9
10
11
12
13
14
15
16
17
18
19
20
21
22
23
24
25
26
27
28
29
30
31
32
33
34
35
36
37
38
39
40
41
42
43
44
45
46
47
48
49
| import com.rabbitmq.client.*;
public class RPCServer {
private static final String RPC_QUEUE_NAME = "rpc_queue";
private static int fib(int n) {
if (n == 0) return 0;
if (n == 1) return 1;
return fib(n - 1) + fib(n - 2);
}
public static void main(String[] argv) throws Exception {
ConnectionFactory factory = new ConnectionFactory();
factory.setHost("localhost");
Connection connection = factory.newConnection();
Channel channel = connection.createChannel();
channel.queueDeclare(RPC_QUEUE_NAME, false, false, false, null);
channel.queuePurge(RPC_QUEUE_NAME);
channel.basicQos(1);
System.out.println(" [x] Awaiting RPC requests");
DeliverCallback deliverCallback = (consumerTag, delivery) -> {
AMQP.BasicProperties replyProps = new AMQP.BasicProperties
.Builder()
.correlationId(delivery.getProperties().getCorrelationId())
.build();
String response = "";
try {
String message = new String(delivery.getBody(), "UTF-8");
int n = Integer.parseInt(message);
System.out.println(" [.] fib(" + message + ")");
response += fib(n);
} catch (RuntimeException e) {
System.out.println(" [.] " + e);
} finally {
channel.basicPublish("", delivery.getProperties().getReplyTo(), replyProps, response.getBytes("UTF-8"));
channel.basicAck(delivery.getEnvelope().getDeliveryTag(), false);
}
};
channel.basicConsume(RPC_QUEUE_NAME, false, deliverCallback, (consumerTag -> {}));
}
}
|
- 我们首先建立连接、信道并声明队列。
- 我们可能希望运行不止一个服务器进程。为了将负载平均分配给多个服务器,我们需要在
channel.basicQos 中设置 prefetchCount。
- 我们使用
basicConsume 访问队列,并以对象(DeliverCallback)的形式提供一个回调,该对象将完成工作并发送响应。
RPCClient
1
2
3
4
5
6
7
8
9
10
11
12
13
14
15
16
17
18
19
20
21
22
23
24
25
26
27
28
29
30
31
32
33
34
35
36
37
38
39
40
41
42
43
44
45
46
47
48
49
50
51
52
53
54
55
56
57
| public class RPCClient implements AutoCloseable {
private Connection connection;
private Channel channel;
private String requestQueueName = "rpc_queue";
public RPCClient() throws IOException, TimeoutException {
ConnectionFactory factory = new ConnectionFactory();
factory.setHost("localhost");
connection = factory.newConnection();
channel = connection.createChannel();
}
public static void main(String[] argv) {
try (RPCClient fibonacciRpc = new RPCClient()) {
for (int i = 0; i < 32; i++) {
String i_str = Integer.toString(i);
System.out.println(" [x] Requesting fib(" + i_str + ")");
String response = fibonacciRpc.call(i_str);
System.out.println(" [.] Got '" + response + "'");
}
} catch (IOException | TimeoutException | InterruptedException | ExecutionException e) {
e.printStackTrace();
}
}
public String call(String message) throws IOException, InterruptedException, ExecutionException {
final String corrId = UUID.randomUUID().toString();
String replyQueueName = channel.queueDeclare().getQueue();
AMQP.BasicProperties props = new AMQP.BasicProperties
.Builder()
.correlationId(corrId)
.replyTo(replyQueueName)
.build();
channel.basicPublish("", requestQueueName, props, message.getBytes("UTF-8"));
final CompletableFuture<String> response = new CompletableFuture<>();
String ctag = channel.basicConsume(replyQueueName, true, (consumerTag, delivery) -> {
if (delivery.getProperties().getCorrelationId().equals(corrId)) {
response.complete(new String(delivery.getBody(), "UTF-8"));
}
}, consumerTag -> {
});
String result = response.get();
channel.basicCancel(ctag);
return result;
}
public void close() throws IOException {
connection.close();
}
}
|
- 我们先建立一个连接和信道
- 我们的
call方法会发出 RPC 请求
- 在这里,我们首先生成一个唯一的
correlationId 编号并保存,我们的消费者 callback 将使用该值来匹配相应的响应
- 然后,我们为回复创建一个队列,并对其进行订阅。
接下来,我们发布请求消息,并附带两个属性:replyTo 和 correlationId。
此时,我们就可以坐等响应到来。
- 由于消费者交付处理是在单独的线程中进行的,因此我们需要在响应到达之前暂停主线程。使用 CompletableFuture 就是一种可行的解决方案。
消费者正在执行一项非常简单的工作,即对每一条已消费的响应信息检查相关性标识(correlationId)是否是我们正在寻找的标识。如果是,它就完成 CompletableFuture。
与此同时,主线程正在等待 CompletableFuture 完成。
- 最后,我们将响应返回给用户。
Spring AMQP
服务端给队列推送消息,客户端监听消息
服务端
1
2
3
4
5
6
7
8
9
10
11
12
13
14
15
16
17
18
19
20
21
| @Configuration
public class RabbitMQConfig {
@Bean
public TopicExchange topicExchange(){
return new TopicExchange(RPC_EXCHANGE, true, false);
}
@Bean
public Queue rpcQueue(){
return new Queue(RPC_QUEUE, true);
}
@Bean
public Binding rpcQueueBinding(){
return BindingBuilder
.bind(rpcQueue())
.to(topicExchange())
.with(RPC_KEY);
}
}
|
1
2
3
4
5
6
7
8
9
10
11
12
13
14
15
16
17
18
| @RestController
@RequestMapping("/amqp")
public class ServerSenderController {
@Autowired
private RabbitTemplate rabbitTemplate;
@GetMapping("/send")
public String send(@RequestParam String message) {
System.out.println("服务端准备发送消息给客户端*******");
rabbitTemplate.convertAndSend(RPC_EXCHANGE, RPC_KEY, message);
System.out.println("服务端发送消息给客户端完毕*******");
System.out.println("其中EXCHANGE 为 " + RPC_EXCHANGE + "Routing key 为:" + RPC_KEY + "消息为:'" + message + "'" );
return "Send Client Success";
}
}
|
客户端
1
2
3
4
5
6
7
8
9
10
11
12
13
14
15
16
17
18
19
20
21
| @Configuration
public class RabbitMQConfig {
@Bean
public TopicExchange topicExchange(){
return new TopicExchange(RPC_EXCHANGE, true, false);
}
@Bean
public Queue rpcQueue(){
return new Queue(RPC_QUEUE, true);
}
@Bean
public Binding rpcQueueBinding(){
return BindingBuilder
.bind(rpcQueue())
.to(topicExchange())
.with(RPC_KEY);
}
}
|
1
2
3
4
5
6
7
8
9
10
11
12
| @Component
public class RPCClientReceiver {
@RabbitListener(queues = RPC_QUEUE)
public void receiveServerMessage(String in) {
System.out.println("****** receiveServerMessage : " + in);
System.out.println("**** *Start owning service");
}
}
|
使用 http client 测试
1
2
| # RPC 测试
GET {{rpc_host}}/amqp/send?message= 你好 我服务端给你客户端发了一个消息 哈哈哈
|